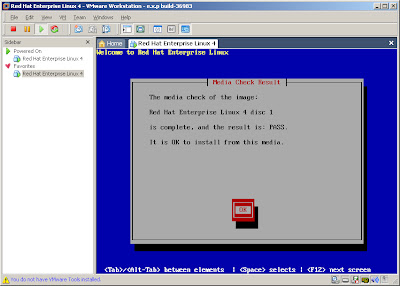
这是转载老外的文章,写得不错。不过他的方法里面没有通过光盘自校验的方法。我只是在最后增加
了一步,让自己制作的光盘也能通过光盘安装时的自检验。呵呵。
Creating a custom Red Hat installation DVD
Created on 19th October 2005
How to create a single CD for fast and easy customized installation.
Setting up the build directory:
The first thing to do is to copy all the cdrom ISOs to one location:
mkdir -p /mnt/disk{1,2,3,4}
mount -o loop RHEL4-U1-i386-AS-disc1.iso /mnt/disk1
mount -o loop RHEL4-U1-i386-AS-disc2.iso /mnt/disk2
mount -o loop RHEL4-U1-i386-AS-disc3.iso /mnt/disk3
mount -o loop RHEL4-U1-i386-AS-disc4.iso /mnt/disk4
We now copy all the files from the directories to a single directory:
mkdir -p /data/isobuild
rsync -rv /mnt/disk{4,3,2,1}/* /data/isobuild/
We also need to copy across the .diskinfo file that is not caught by our *:
cp /mnt/disk1/.diskinfo /data/isobuild/
The .diskinfo file identifies the CD as being a correct Red Hat Installer disk
and is checked by anaconda during the start of the install.
We could now build the DVD as it is but we really should have a fiddle first :-)
Adding more software to the DVD
We could add some of our own rpms to /data/isobuild/RedHat/RPMS; however by just
doing this does not make them available at install time. There is an XML file
that is read and ensures that the packages are installed in the correct order.
So let us throw a few random packages into the mix:
Add some java:
cp jre-1_5_0_03-linux-i586.rpm /data/isobuild/RedHat/RPMS/
Some encryption for GAIM:
cp gaim-encryption-2.36-3.rf.i386.rpm /data/isobuild/RedHat/RPMS/
Updating the comps.xml file
We need to ensure that the host computer has anaconda and anaconda-runtime installed:
up2date anaconda anaconda-runtime
Before we update the XML dependency file we need to sort out package orders.
If you have added a lot of new packages you may need to remove some old
packages that you have replaced with newer versions to stop conflicts.
So the first command is:
PYTHONPATH=/usr/lib/anaconda /usr/lib/anaconda-runtime/pkgorder \
/data/isobuild/ i386 > /data/isobuild/xander-pkgorder
This creates a list of files in the order it needs to install them
in the file /data/isobuild/xander-pkgorder. Sometimes an occasional
RPM will not provide the information anaconda needs. You can edit
the file manually and insert your RPMs at the end.
Next we need to generate the dependency file:
/usr/lib/anaconda-runtime/genhdlist --fileorder /data/isobuild/xander-pkgorder \
/data/isobuild/
You will probably have a few hiccoughs the first time you run these commands.
Most may be resolved by adding the missing entries to the pkgorder file or
deleting duplicate packages.
Creating an automated installer
We could *now* if we wanted to build our DVD; however we can make an
automated installer.
So crack open system-config-kickstart and create a kickstart file with
all the packages and partitioning etc you need for your systems.
copy the resulting file to /data/isobuild/ks.cfg
we can now edit the file /data/isobuild/isolinux/isolinux.cfg
copy or change the three lines:
label linux
kernel vmlinuz
append initrd=initrd.img ramdisk_size=8192
to
label xander
kernel vmlinuz
append initrd=initrd.img ramdisk_size=8192 ks=cdrom:/ks.cfg
Then change the default at the top of the file to xander. This means that
the default action is to install directly from the DVD using your kickstart file.
Building the DVD iso
Now to build the iso:
cd /data/isobuild
chmod a+w isolinux/isolinux.bin
mkisofs -r -T -J -V "Custom RHEL4 Build" -b isolinux/isolinux.bin \
-c isolinux/boot.cat -no-emul-boot -boot-load-size 4 \
-boot-info-table -o /data/custom-RHEL4-dvd.iso /data/isobuild/
下一步,我们增加光盘自校验操作。这一步可能会花费2-3分钟,请耐心等待。
/usr/lib/anaconda-runtime/implantisomd5 /data/custom-RHEL4-dvd.iso
Inserting md5sum into iso image...
md5 = 135556ca60f1225a265346acab07086f
Setting supported flag to 0
Buring the DVD
Now we can burn the image to the CD. I assume the CD writer is already
set up on your system. We use cdrecord below, but you can use other
programs as well. The command is invoked as:
cdrecord -v speed=4 dev=0,0,0 /data/custom-RHEL4-dvd.iso
The speed and dev options depend on your system. The device for the dev
argument can be determined by using the -scanbus option to cdrecord:
cdrecord -scanbus
Using the DVD
Once the image is burned onto the DVD, insert the DVD into the target
machine and boot the machine. You should get the custom message that
you created earlier. At this point, you can either press Enter at the
boot prompt or let it timeout. When it times out it uses the default
label, which we specified as ks (Kickstart).

没有评论:
发表评论